User Manual
Introduction
Everytime a student (or a teacher who's not logged in to a teacher computer)
logs in, the application starts minimized in the destkop panel notification
area. It's easy to identify it by its icon

.
Clicking on it will show or hide the application.
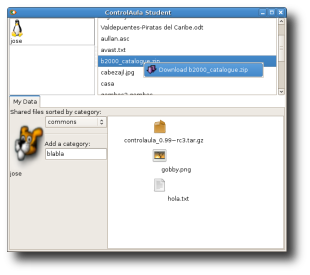
The application looks like the image at left, in which we can see three
different areas:
- Upper left: Classmate icons area.
- Upper right: List of files shared by the selected
classmate.
- Lower tab: Personal icon, shared folders and files in
the selected folder.
Colleagues icons area
Whenever classmates or a teacher logs in,
their icons will appear in this area.
The user's login name will appear under each icon, and moving the mouse over
the icon will display a small text box with the user's full name (if that data
was provided when the user account was created).
Left clicking on the classmate icon
will display the files he or she is sharing in the right-hand pane.
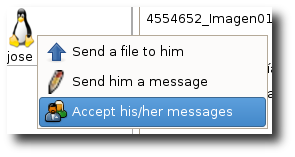
Right clicking on the classmate icon will display the menu you can
see on the right; this menu will allow the user to:
- Send a file to her classmate: A dialog will appear that allows the user
to choose a file from disk that will be sent once selected. The
receiver will see a dialog that will allow him to accept or reject
the file -- except if the file is sent by the teacher. If the file is
accepted it will be copied to his home folder on his computer.
- Send a message to her classmate: a small dialog with a
textbox will appear to write the message to be sent.
- Aceppt/Reject her messages: To authorize or block every
message coming from a particular classmate. Messages coming from the teacher
cannot be blocked.
Lower tab
The lower tab contains the user
application data. It's split into three parts:
- User photo (or icon): can be changed in three
ways: dragging an image file from the file explorer over the current photo[1];
using the copy menu in the file explorer and right clicking on the
current photo, then selecting paste in the popup menu; or using the
application to change the login photo for gdm or kdm (gdmphotosetup for
gnome users or throught the control panel, appearance section for KDE
users).
- Shared files categories: ControlAula allows the user to group
shared files by categories. A student could organize his or her file
something like: common, maths, chemistry, etc.; or like: common, first, second,
third, etc. Only the files in the selected
category are shared. The application always shares the files in the
common category.
The user can create new categories by typing the new name and pressing
Enter in the textbox under "Add
a category".
- Shared files: the shared files under this category are
shown. There are two ways to share a new file: dragging
and dropping it from the file explorer onto this frame[1]
or using the copy and paste menus, just as with the user photo. Right
clicking on a selected file will raise a pop-up menu to delete the
file, copy it to the user home folder, or copy it to the user Desktop.
Files with a size smaller than 200 Kbytes will be shared via http, others
will use the bittorrent protocol for sharing.
Shared files by selected classmate area
After left clicking on a
classmate icon, all her currently shared files will appear in
this frame.
To download any of the files, left click on the file to display the download
menu. Download time will depend on the file
size. When the download is finished a warning will appear and the file
will be placed in the current shared files area of the user. Every time
a shared file is downloaded it will automatically become a shared file for
the user who downloaded it.
Application manuals
[1] This action
won't work if the application is using a version of the gambas gtk component
lower than 1.9.91 because of a bug in that component
Last modification on 16th
November, 2007.


